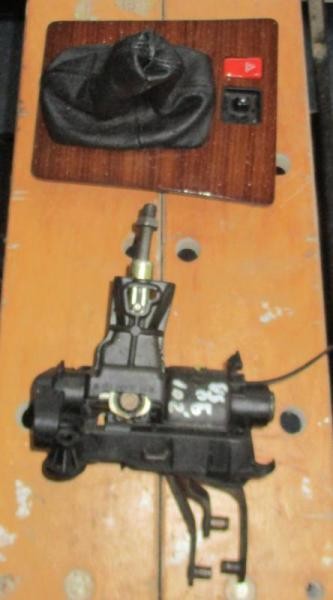
Is your classic Mercedes-Benz W124 experiencing sluggish gear changes, particularly with 5th gear or reverse? Many W124 owners with manual transmissions encounter issues with shifter responsiveness over time. This guide provides a detailed, step-by-step process to refurbish your 5-speed shifter, enhancing your driving experience and restoring that smooth, precise gear selection you expect from a Mercedes-Benz.
This refurbishment focuses on the disassembly of the shifter unit, a crucial first step in diagnosing and resolving common problems. While issues can sometimes stem from the gearbox itself, often the culprit lies within the shifter mechanism and its linkages. By systematically disassembling and inspecting the shifter, you can identify worn components and prepare for a comprehensive rebuild.
Before we begin, it’s essential to understand the symptoms that indicate your W124 5-speed shifter might need attention. Common signs include:
- Difficulty engaging 5th gear: Notchy or hesitant entry into 5th.
- Reluctance to go into reverse: Needing to lift the clutch pedal in neutral to engage reverse.
- General shifter looseness or play: Excessive movement before gear engagement.
If you’re experiencing these issues, shifter refurbishment is a worthwhile DIY project. Let’s delve into the disassembly process.
Step-by-Step Shifter Disassembly
1. Shifter Removal
The initial step is removing the shifter assembly from your Mercedes-Benz W124. This process is generally straightforward. If you’re unfamiliar with this stage, it’s recommended to consult your W124 service manual for specific instructions.
2. Disconnecting the Reverse Light Switch
Before proceeding further with disassembly, it’s crucial to disconnect the reverse light switch. This small electrical component is typically attached to the shifter assembly and should be carefully detached to avoid damage.
3. Initial Disassembly
With the shifter removed and the reverse light switch disconnected, we can begin the deconstruction process. The first step involves removing the readily accessible bolts.
4. Removing 10mm Bolts
Locate and remove the two 10mm bolts that secure part of the shifter assembly. These are usually easily identifiable on the top section of the shifter.
5. Spring Loaded Mechanism
Be aware that the shifter mechanism is spring-loaded. As you remove components, anticipate a slight release of tension. However, this spring is not overly strong, and disassembly is manageable.
6. Component Separation
After removing the bolts and accounting for the spring, components will begin to separate from the shifter assembly.
7. Levers and Linkages
The levers that connect to the shifter rods will come out as a group. Pay close attention to the orientation of washers and spring washers during removal. Referencing an EPC diagram for your W124 model is highly recommended to ensure correct reassembly.
8. Securing Washers (Optional)
To keep washers and small parts organized during disassembly, you can use methods like tie wraps or gloves to temporarily secure them in their correct groups and order.
9. Plastic End Cap Removal
A clear plastic end cap is another component that needs to be removed during the shifter disassembly.
10. C-Clips and Retaining Pin
Fiddly C-clips are located on either end of a retaining pin. These can be carefully pushed off using small electrical screwdrivers. Exercise caution not to lose these small clips.
11. Retaining C-Clips
Keep the C-clips in a safe place, even though replacement clips are typically included in shifter repair kits.
12. Torx Screws and Shaft
The next stage involves removing the two Torx-headed screws. It’s important to note the position of components on the shaft before removal, although as later discovered in the original thread, precise measurement isn’t always critical.
This detailed disassembly guide provides a solid foundation for refurbishing your Mercedes-Benz W124 5-speed shifter. Once disassembled, you can thoroughly inspect each component for wear and prepare for the reassembly process, ideally with a new shifter refurbishment kit. Stay tuned for the next part, where we’ll discuss inspection, repair, and reassembly to bring your W124’s gear changes back to their original Mercedes-Benz smoothness.