Are you experiencing issues with your Benz W124’s 5-speed manual shifter? Many W124 owners find that over time, shifting, especially into 5th gear and reverse, becomes less smooth. You might notice notchiness in 5th or need to double-clutch to engage reverse properly. While these symptoms could point to gearbox synchromesh problems, often the culprit is simply wear and tear in the shifter mechanism itself.
Before assuming major transmission work, consider refurbishing your W124’s 5-speed shifter. This DIY project can often restore smooth and precise shifting, making your driving experience more enjoyable. This guide will walk you through the process of removing and disassembling your W124 shifter for refurbishment.
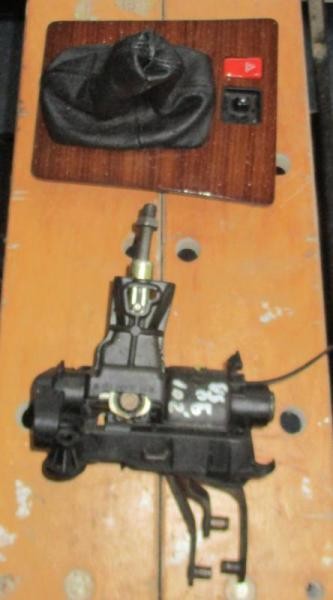
Removing the W124 Shifter: Getting Started
The first step in this refurbishment is to remove the shifter assembly from your Benz W124. This is a straightforward process, and if you’re comfortable with basic car maintenance, you should find this part easy.
Image alt text: Removed 5-speed shifter assembly from a Benz W124, highlighting the shifter cavity.
Pre-Disassembly Note: It’s wise to remove the reverse light switch before proceeding further with the disassembly. This prevents accidental damage to the switch during handling.
Image alt text: Reverse light switch on a Mercedes W124 manual shifter, urging removal before refurbishment.
Disassembling the W124 5-Speed Shifter: Step-by-Step
With the shifter removed and the reverse light switch detached, you can begin the disassembly process. This involves carefully taking apart the shifter mechanism to access the components that are likely worn and causing your shifting issues.
Image alt text: Initial disassembly of a W124 5-speed shifter, revealing internal components.
Step 1: Remove Bolts. Locate and remove the two 10mm bolts that secure part of the shifter assembly.
Image alt text: Removing 10mm bolts from a Benz W124 shifter during refurbishment.
Step 2: Spring Tension. Be mindful that the assembly is spring-loaded. However, the spring tension is manageable and not a cause for concern.
Image alt text: Spring mechanism in a W124 shifter, noting manageable tension during disassembly.
Step 3: Lever Group Removal. The levers for the shifter rods will come out as a group once the bolts are removed.
Image alt text: Extraction of shifter rod levers from a Mercedes W124 5-speed shifter.
Step 4: Washer and Spring Washer Order. Pay close attention to the arrangement of washers and spring washers as you disassemble. While parts diagrams are helpful, noting the original order will aid in reassembly.
Image alt text: Order of washers and spring washers on a W124 shifter, crucial for correct reassembly.
Step 5: Glove Trick (Optional). To keep parts organized, especially small washers, a glove can be used to contain them after removal.
Image alt text: Glove used as a parts organizer during Mercedes Benz W124 shifter refurbishment.
Step 6: Plastic End Cap. Remove the clear plastic end cap from the shifter assembly.
Image alt text: Plastic end cap removal from a W124 gear shifter during refurbishment.
Image alt text: W124 shifter assembly after plastic end cap removal, preparing for next steps.
Step 7: C-Clips. Carefully detach the fiddly C-clips located on either end of a retaining pin. Two small electrical screwdrivers can be helpful for this task.
Image alt text: Removing C-clips from a Mercedes W124 shifter pin with screwdrivers for repair.
Image alt text: Detailed C-clip removal from a Benz W124 manual transmission shifter for refurbishment.
Step 8: Retain C-Clips. Keep the small C-clips safe, even though new ones are often included in repair kits.
Image alt text: Small C-clips from W124 shifter disassembly, highlighting their small size and importance.
Image alt text: Disassembled parts of a Benz W124 5-speed shifter during a DIY repair process.
Step 9: Torx Screws. The next step involves removing two Torx-headed screws. Before removing these, some guides suggest measuring the shaft position for reassembly reference, but this is often unnecessary.
Image alt text: Torx screws on a W124 shifter, step in disassembling for refurbishment.
Image alt text: Shaft and Torx screw locations on a Mercedes W124 shifter before disassembly.
Image alt text: Shaft and clamp detail of a W124 shifter mechanism during refurbishment.
W124 Shifter Repair Kit Considerations
When refurbishing your Benz W124 shifter, consider using a repair kit. However, be aware that not all kits are universally compatible with all W124 5-speed shifters.
Image alt text: Mercedes Benz W124 shifter repair kit, part number 1242602539, noting potential compatibility issues.
Part number 1242602539, for example, is designed for a less common shifter configuration where reverse gear is located to the left and up, next to first gear. It may not be a direct fit for shifters with reverse positioned in the more typical location. You might need to modify parts of a kit or source components individually to ensure compatibility with your specific W124 5-speed shifter. Always double-check compatibility or be prepared to adapt components as needed for your Benz W124 refurbishment project.